从零搭建 Node Faas(五)数据库能力
这篇文章将梳理一下 Faas 在数据库能力上的一些实践。
一、背景
1. 设想
可以站在用户的角度设想一下,在使用数据库的时候,希望的使用体验是怎么样的。那当然是希望能够开箱即用。
一般公司级的数据库创建一般都是要走工单审批的,这个流程非常的繁琐,而且管控可能也会比较严格。因此一个 Faas app 应用对应一张表的设计是更加合理的。
2. 非关系型数据库?
那这样就带来一个问题,Faas 的一张表需要存储数据库的多张表的数据。很容易想到一个方案,比如用非关系型数据库 MongoDB 来存储,这样问题好像就迎刃而解了。
但是如果这么简单能实现的话,那就不需要写这篇文章了。实际上,我们的数据库是关系型数据库,原因是因为基建不支持使用非关系型数据库,因此需要在关系型数据库中实现这个功能。
3. 关系型数据库!
再进一步想一个替代方案,就是将 Mysql 的一个字段设计成一个 JSON 字段,这就就可以近似实现非关系型数据库的功能。但是这样会有一个问题,就是需要提供给用户一个更加友好的接口,让用户能更加方便的操作这个 JSON 字段。
这篇文章就是要解决这个问题。
二、技术设计
1. SDK 设计
设计的 SDK 如下,比如下面的代码包含了插入,查询的操作。
1
2
3
4
5
6
7
8
9
10
11
| interface Model {
name: string
age: number
}
export async function main() {
const table = sdk.db.table<Model>("test")
await table.insert({ name: 'John', age: 18 })
const data = await table.select('*').where({ name: 'John' }).first()
return data
}
|
2. 具体实现
这里选用 Knex.js 来实现数据库的封装,想让用户简便的操作,就需要给每个方法都封装一层。
2.1 Select
比如这里用 Knex.js 的 jsonExtract 方法来包一层,实现 select 方法。参见文档:https://knexjs.org/guide/query-builder.html#jsonextract
1
2
3
4
5
6
7
8
9
10
11
12
13
14
15
16
17
18
| select(...args: (keyof TableType<T> & string)[]): this
select(...args: string[]): this
select(...args: string[]) {
this.hasCallSelect = true
for (const arg of args) {
if (fixedColumns.includes(arg as any)) {
this.query.select(arg)
} else if (arg === '*') {
this.query.jsonExtract(JSON_COLUMN_NAME, `$`, '__extract_*_from_json')
for (const column of fixedColumns) {
this.query.select(column)
}
} else {
this.query.jsonExtract(JSON_COLUMN_NAME, `$.${arg}`, arg)
}
}
return this
}
|
用户就可以如下使用:
1
| await table.select('name', 'age').first()
|
2.2 Where
这里设计了一个 where 方法,支持多种参数的传递。参见文档:https://knexjs.org/guide/query-builder.html#wherejsonpath
1
2
3
4
5
6
7
8
9
10
11
12
13
14
15
16
17
18
19
20
21
22
23
24
25
26
27
28
29
30
31
32
| where(
data:
| Partial<{ [K in keyof TableType<T>]: TableType<T>[K] | WhereOperator }>
| { [key: string]: any },
): this
where(column: keyof TableType<T> & string, value: any): this
where(column: keyof TableType<T> & string, operator: string, value: any): this
where(...args: any[]) {
if (typeof args[0] !== 'string') {
for (const [key, value] of Object.entries(args[0])) {
if (!isWhereOperator(value)) {
this.where(key as any, value)
continue
}
this.where(key as any, value.operator, value.value)
}
} else if (args.length === 2) {
this.where(args[0] as any, '=', args[1])
} else {
if (fixedColumns.includes(args[0] as any)) {
this.query.where(args[0], args[1], args[2])
} else {
this.query.whereJsonPath(
JSON_COLUMN_NAME,
`$.${args[0]}`,
args[1],
args[2],
)
}
}
return this
}
|
比如用户可以如下使用:
1
2
| const data2 = await table.where('name', 'John').first()
const data3 = await table.where('age', '<', 18)
|
2.3 Insert
1
2
3
4
5
6
7
8
9
| async insert(_data: T | T[]) {
const data = Array.isArray(_data) ? _data : [_data]
const result = await this.query.insert(
data.map((x) => ({
[JSON_COLUMN_NAME]: JSON.stringify(x),
})) as any,
)
return result
}
|
使用方式:
1
| await table.insert({ name: 'John', age: 18 })
|
2.4 Update
这里会用 JSON_MERGE_PATCH 来将非固定列的键值以 JSON 格式合并到一个 JSON 列中。参见文档:https://dev.mysql.com/doc/refman/8.4/en/json-modification-functions.html#function_json-merge-patch
最终使用原始 SQL 更新查询。
1
2
3
4
5
6
7
8
9
10
11
12
13
14
15
16
17
18
19
20
21
22
23
24
25
26
27
28
29
30
| async update(data: Partial<T> | { [key: string]: any }): Promise<void> {
let parts: string[] = []
let values: any[] = []
if (!Object.keys(data).length) {
return
}
const rest: any = {}
for (const key in data) {
if (fixedColumns.includes(key as any)) {
parts.push(`?? = ?`)
values.push(key, (data as any)[key])
} else {
rest[key] = (data as any)[key]
}
}
if (Object.keys(rest).length) {
parts.push(`?? = JSON_MERGE_PATCH(??, ?)`)
values.push(JSON_COLUMN_NAME, JSON_COLUMN_NAME, JSON.stringify(rest))
}
const sql = this.query
.update({ __hack_replace_set_clause__: 0 } as any)
.toString()
await this.client.raw(
sql.replace('`__hack_replace_set_clause__` = 0', parts.join(',')),
values,
)
}
|
使用方式:
1
| await table.where({ id: 1 }).update({ name: 'John' })
|
2.5 Delete
Delete 这里就没有必要再封装了,把前面查出来的数据,直接调用 delete 即可。
1
2
3
| async delete(): Promise<number> {
return await this.query.delete()
}
|
使用方法:
1
| await table.where({ id: 1 }).delete()
|
2.6 其他
还有很多方法都要封装,这里就不一一列举了。只要熟悉了操作 Json 格式的数据库,后面都是大同小异了。这里列举一下要封装的清单:
- insert
- first
- all
- select
- delete
- update
- where / andWhere
- orWhere
- whereIn
- whereNull
- whereExists
- whereBetween
- whereLike
- count
- limit
- offset
- orderBy
- sum
- max
- min
- avg
- groupBy
三、在线执行
Faas 平台希望能方便简化用户的操作,所以也提供了在线执行 SQL 的功能,来方便用户快速验证,或者快速查询一些数据,而无需编写代码。
这里主要介绍一下 Server 部分执行 SQL 的逻辑。核心就是:用 Babel 将用户输入的内容解析成 AST。
1. 原因
因为想尽可能保证用户输入的灵活性与方便性,所以没有使用多个 Form 字段限制输入。由于用户输入的不确定性,服务端在执行语句的时候需要一些限制,所以需要尽可能的避免 eval() 的使用。所以最终设计类似如下的执行方式:
1
2
3
4
5
6
7
8
9
10
11
12
13
14
15
16
17
18
| switch (name) {
case 'insert':
result = await result.insert(...args)
break
case 'first':
result = await result.first()
break
case 'all':
result = await result.all()
break
case 'select':
result = result.select(...args)
break
case 'delete':
result = await result.delete(...args)
break
}
|
会将解析出来的 token 然后依次执行对应的方法。
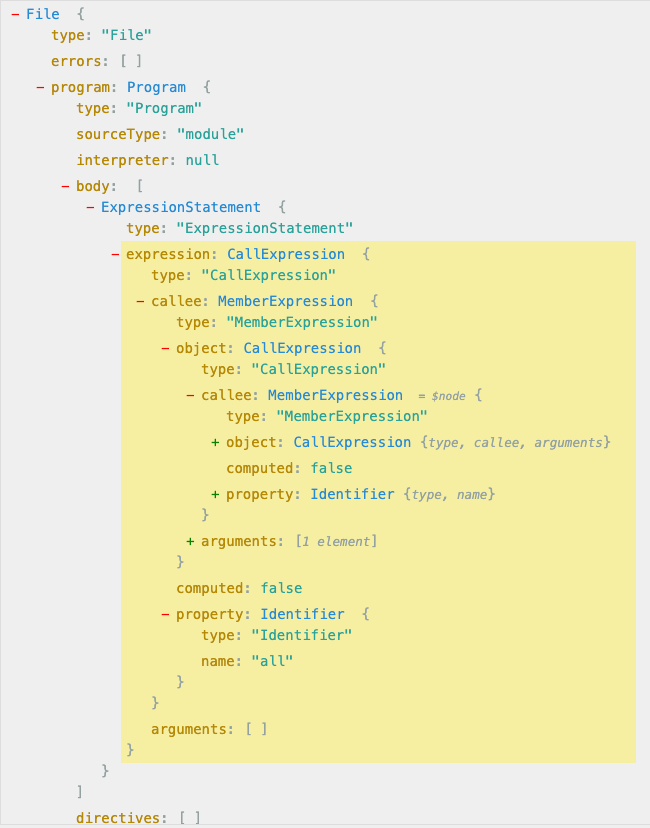
2. 解析语法树
1
| table.select("*").where({ name: 'zhd' }).all()
|
比如上面的语句会被解析成如下结构:

其中函数执行的 Node 节点都为 CallExpression 的 MemberExpression 中。参数则是可以按照 Faas DB 使用文档中的 Object、Array、其他这三种来区分即可。分别关注一下 ObjectExpression 和 ArrayExpression 做特殊处理即可。
按照上面的语句遍历的顺序是 all()、where()、select() 顺序,所以存到栈中反过来取出即可。
四、总结
数据库设计就总结到这里了,也不得不说,一些轮子的诞生都是因为落实到每个场景都会有不一样的需求。这里的数据库设计也是如此,因为我们的基建不支持非关系型数据库,所以需要在关系型数据库中实现这个功能。


