其实是由一个小问题引发的,在配置icarus主题的时候,发现的一个问题,类似这个链接。就是hexo-renderer-inferno这个插件没有正常运行导致的,但是node_modules中可以很明显的看到,作为hexo-theme-icarus依赖的依赖,是被正常的安装下来了,按照文中的解决方案虽然能解决,但是并没有真正从源头上解决。基于这个原因,想从hexo的源码中看一看插件加载机制。

很明显搜索引擎按照hexo 源码作为关键字的搜索结果中,并没有真正的源码分析,都是非常浅层的解析。所以这里我将从源码的角度尝试分析一下hexo内部的运行机制。

注:hexo的版本"version": "5.4.0"

导读

这里将分几篇文章把我在阅读hexo代码的过程记录一下,作为hexo源码阅读第一篇文章,将分析一下hexo-cli的设计实现思路。

输入 hexo 发生了什么?

和其他的脚手架一样,首先是从package.json中的bin字段开始的。bin有什么用可自行去npm文档查看。

hexo的bin

我们在安装完npm i hexo之后,可以看到hexo的package.json中的bin字段如下

1
2
3
"bin": {
"hexo": "./bin/hexo"
},

此时,执行 hexo命令之后,后续就会被bin/hexo接管,可以看下bin/hexo的内容,直接使用了hexo-cli暴露的方法。

1
2
3
#!/usr/bin/env node
'use strict';
require('hexo-cli')();

hexo-cli做的事情

接下来我们来看一看hexo-cli做了什么,直接找 package.json中的 main字段,找到入口文件lib/hexo.js,接下来执行hexo ...都会被这里接管。

hexo-cli和其他cli工具类似,里面的实现并不复杂,大致看一下就能了解实现原理,如果想了解一般cli的执行流程,你可以看我之前写的 vue-cli源码学习2.x,里面分析了vue-cli版本2的实现原理。

hexo-cli提供了inithelpversion这三个命令,那么此时你一定会有一个疑惑,hexo serverhexo g等等命令是怎么执行的?hexo-cli和hexo两个依赖的关系是怎么样的?

其实我的最大的疑问也在这里,因为按照cli的惯例,一般所有命令都会在cli中实现对应的逻辑,但是经过调试发现,hexo似乎并不想这么做,而是把其他的命令逻辑放到hexo这个依赖中了。我理解是hexo作为一个暴露出来的核心类,里面的逻辑会很复杂,所以单独抽离出来了,hexo-cli只是提供了很简单的一个功能。那么我们接下来看。

1
2
3
4
5
6
7
8
9
10
11
12
13
14
15
16
17
18
19
20
21
22
23
// hexo-cli/lib/hexo.js
return findPkg(cwd, args).then(path => {
if (!path) return;
// ...
}).then(mod => {
if (mod) hexo = mod;
log = hexo.log;

// 注册 hexo的控制台命令
require('./console')(hexo);

return hexo.init();
})

function loadModule(path, args) {
return Promise.try(() => {
// 会在目标目录中找 hexo这个依赖的路径,然后实例化 hexo
const modulePath = resolve.sync('hexo', { basedir: path });
const Hexo = require(modulePath);

return new Hexo(path, args);
});
}

上面这段逻辑就是实例化Hexo的关键步骤,第一遍看的时候没发现,后来才发现这里,这个就是hexo-clihexo这两个依赖之间的关系。同时这里也做了保底逻辑,如果没有找到对应的hexo依赖的路径,那么会有一个保底逻辑,直接使用hexo-cli中内置的 Context来实例化 Hexo对象,你可以在hexo-cli/lib/context.js中找到对应的实现。

我们先来看看假如使用hexo-cli中的实例化 Hexo是如何做的

1
2
3
4
5
6
7
8
9
10
11
12
13
// hexo-cli/lib/context.js
class Context extends EventEmitter {
constructor(base = process.cwd(), args = {}) {
super();
this.base_dir = base;
this.log = logger(args);

this.extend = {
console: new ConsoleExtend()
};
}
// ...
}

其他的暂时都不太重要,我们直接省去,我们先来看这一段

1
2
3
4
// hexo-cli/lib/context.js
this.extend = {
console: new ConsoleExtend()
};

这一段赋值了 extend,里面为 console实例化了一个 ConsoleExtend对象,为什么要看这个?

1
2
3
// hexo-cli/lib/hexo.js
// 注册 hexo的控制台命令
require('./console')(hexo);

上面这段逻辑注册了 hexo的命令,那么里面是如何实现的插件注册逻辑?

hexo-cli的插件式结构

1
2
3
4
5
6
7
8
9
10
11
12
13
14
15
16
17
18
19
20
// hexo-cli/lib/console/index.js
module.exports = function(ctx) {
const { console } = ctx.extend;

console.register('help', 'Get help on a command.', {}, require('./help'));

console.register('init', 'Create a new Hexo folder.', {
desc: 'Create a new Hexo folder at the specified path or the current directory.',
usage: '[destination]',
arguments: [
{name: 'destination', desc: 'Folder path. Initialize in current folder if not specified'}
],
options: [
{name: '--no-clone', desc: 'Copy files instead of cloning from GitHub'},
{name: '--no-install', desc: 'Skip npm install'}
]
}, require('./init'));

console.register('version', 'Display version information.', {}, require('./version'));
};

使用了 Hexo实例化的 extend字段,里面的 console就是 ConsoleExtend实例化的对象,使用 console.register来为hexo控制台提供命令注册,我们来看下ConsoleExtend的具体实现。

1
2
3
4
5
6
7
8
9
10
11
12
13
14
15
// hexo-cli/lib/extend/console.js
class Console {
constructor() {
this.store = {};
this.alias = {};
}

register(name, desc, options, fn) {
// ...
this.store[name.toLowerCase()] = fn;
const c = fn;
c.options = options;
c.desc = desc;
}
}

可以看到这里最核心的部分其实就是为传进来的回调方法添加上 optionsdesc属性,因为fn传递的是引用,因此这里是会为传进来的fn修改对应的 optionsdesc的。hexo的命令存储结构是类似 { [name]: fn: Function }这种结构的(虽然我个人觉得这种方式不太好,更理想的结构应该是{ [name]: { fn: Function, desc: string } },类似这样的结构)。不过这不重要,知道整体的设计思路即可。

所有调用register的都会被记录到 Hexo实例对象的 store字段中,这样就完成了插件的注册步骤,最终结构类似下面

1
2
3
4
5
6
7
8
9
10
11
12
13
14
15
16
{
help: [Function (anonymous)] { options: {}, desc: 'Get help on a command.' },
init: [Function (anonymous)] {
options: {
desc: 'Create a new Hexo folder at the specified path or the current directory.',
usage: '[destination]',
arguments: [Array],
options: [Array]
},
desc: 'Create a new Hexo folder.'
},
version: [Function (anonymous)] {
options: {},
desc: 'Display version information.'
}
}

如何执行 hexo

1
2
3
4
5
6
7
8
9
10
11
12
13
14
15
16
17
18
19
20
21
22
23
24
function entry(cwd = process.cwd(), args) {
// ...
return findPkg(cwd, args).then(path => {
// ...
}).then(mod => {
// ...
}).then(() => {
let cmd = 'help';

if (!args.h && !args.help) {
const c = args._.shift();
// 这里取到 hexo命令执行的 目标
// 比如 cmd = 'init'
if (c && hexo.extend.console.get(c)) cmd = c;
}

watchSignal(hexo);
// 执行的关键 hexo.call(),cmd代表从命令行中取到的命令
return hexo.call(cmd, args).then(() => hexo.exit()).catch(err => hexo.exit(err).then(() => {
// `hexo.exit()` already dumped `err`
handleError(null);
}));
}).catch(handleError);
}

我们依然只看关键的代码逻辑,可以看到hexo.call(cmd, args)这句代码就是执行的关键,里面的cmd参数代表了想要执行的命令,然后我们来看看hexo.call()的实现。

1
2
3
4
5
6
7
8
9
10
11
12
13
14
15
16
17
18
19
20
class Context extends EventEmitter {
// ...
call(name, args, callback) {
if (!callback && typeof args === 'function') {
callback = args;
args = {};
}

return new Promise((resolve, reject) => {
const c = this.extend.console.get(name);
// c是 fn,fn有 options和 desc
if (c) {
c.call(this, args).then(resolve, reject);
} else {
reject(new Error(`Console \`${name}\` has not been registered yet!`));
}
}).asCallback(callback);
}
// ...
}

就是直接调用我们上文中register注册的方法,然后根据传入的name执行对应的方法回调。hexo-cli提供了inithelpversion三个命令(不包含hexo依赖中注册的),你可以去hexo-cli/lib/console中去查看对应的三个命令实现,这里不再赘述,我们只提供主干流程的梳理,对应的细节你可以去代码中查看。

hexo-cli的执行过程

至此,hexo-cli的整体实现逻辑,我们已经看完了。画一张流程图简单梳理一下。
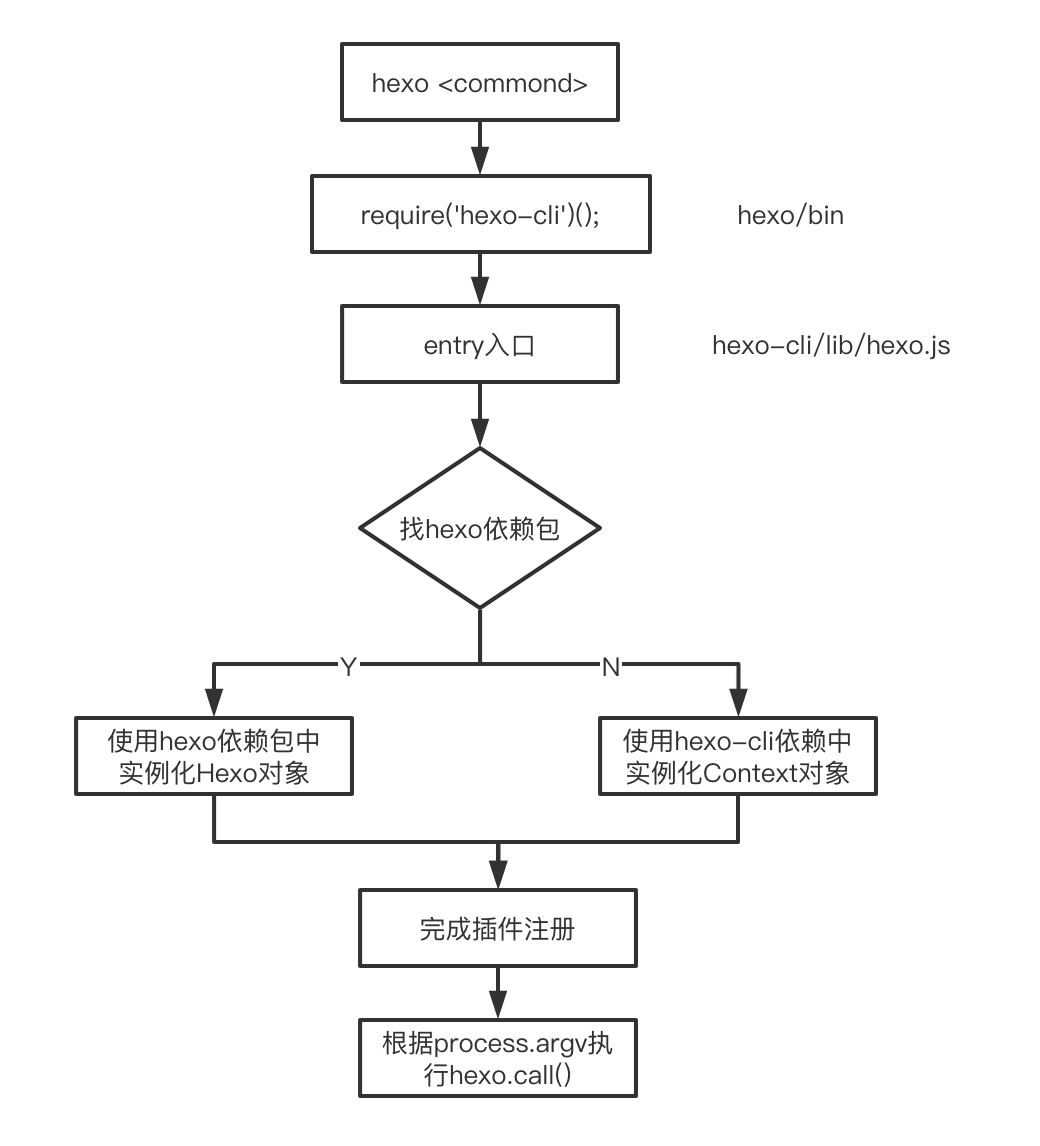
小结

整个cli的过程其实大同小异,和其他的cli整体实现思路比较类似。